
Arduino UNO
Introduction to Arduino UNO
A Deep Dive into the Arduino Uno in Khurafati Labs Style!
Hey Khurafati Labs fam! If you've been following our channel, you know we love to tinker, experiment, and bring awesome electronic projects to life. Our recent video gave you a sneak peek into the amazing world of the Arduino Uno, and today, we're going to take an even deeper dive into this incredible microcontroller board. Get ready to level up your technical knowledge!
What Exactly is an Arduino Uno? Your Pocket-Sized Powerhouse!
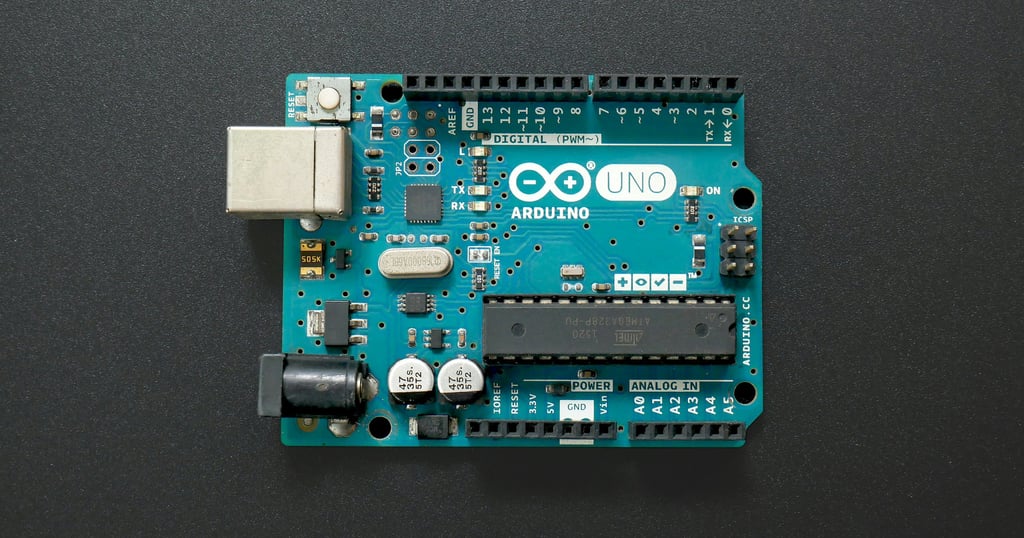
At its heart, the Arduino Uno is a microcontroller board – think of it as a tiny, programmable computer designed to interact with the physical world. It's the brain behind countless DIY projects, from blinking LEDs to complex home automation systems. What makes it so popular, especially for us beginners (and even seasoned pros)? Its simplicity, versatility, and the massive, supportive community behind it!
The Brains of the Operation: The ATmega328P Microcontroller
The Arduino Uno is built around the ATmega328P microcontroller. This little chip is where all the magic happens. It's an 8-bit AVR microcontroller with a RISC architecture, meaning it's designed for efficient execution of instructions. It operates at a clock speed of 16 MHz, which is like its heartbeat, dictating how fast it can process information.
Powering Up Your Creations: Voltage and Power
My Arduino Uno runs on a voltage of 5V. I usually power it via the USB connection to my computer, but you can also use a DC power jack (with a recommended input voltage of 7-12V), or even directly through the Vin pin. Plus, it gives us a regulated 3.3V output for those components that need a bit less juice.
The Digital World: On or Off, That's the Question!
One of the most fundamental aspects of the Arduino Uno is its 14 digital input/output (I/O) pins. As I showed you in the video, these pins are like simple switches. They can be in one of two states:
HIGH (1 or ON): This is typically 5V. I use this to turn on an LED, activate a relay, or send a "true" signal.
LOW (0 or OFF): This is typically 0V (ground). I use this to turn off an LED, deactivate a relay, or send a "false" signal.
These pins are perfect for controlling things like LEDs, buttons, and even reading digital sensors that only give you an "on" or "off" signal. Six of these digital pins (3, 5, 6, 9, 10, 11) also support Pulse Width Modulation (PWM). PWM lets us simulate analog output by rapidly switching the digital pin on and off at varying durations – super useful for dimming LEDs or controlling motor speeds!
Stepping into the Analog Realm: A World of Nuance
Beyond the digital, the Arduino Uno also features 6 analog input pins (A0 to A5). Unlike their digital counterparts, analog pins can read a continuous range of values. This is crucial for connecting sensors that provide varying outputs, such as:
Soil moisture sensors: To tell me exactly how wet my plant's soil is, not just "wet" or "dry."
Temperature sensors: To give me a precise temperature reading.
Potentiometers: To read varying resistance, often used for volume control or input sliders.
These analog pins use a 10-bit Analog-to-Digital Converter (ADC), meaning they can distinguish between 1024 different values (from 0 to 1023) when reading an analog signal. Pretty neat, right?
Memory Matters: Flash, SRAM, and EEPROM Explained
Just like your computer, my Arduino Uno needs memory to function. It has three main types:
Flash Memory (32 KB): This is where my program, or "sketch," is stored. It's non-volatile, meaning my code stays put even when the Arduino is powered off. Think of it as the hard drive for my Arduino's brain. For most of my small to medium-sized projects, 32 KB is plenty!
SRAM (Static Random-Access Memory) (2 KB): This is the volatile memory I use for storing variables and data while my program is running. When the Arduino is powered off, the data in SRAM is lost. It's like my computer's RAM – fast, but temporary.
EEPROM (Electrically Erasable Programmable Read-Only Memory) (1 KB): This is a special type of non-volatile memory that lets me store small amounts of data that stick around even after the Arduino is turned off. As I showed you in the video, it's perfect for saving configurations, calibration values, or the last state of a device (like an AC remembering its last setting!).
Getting Started: Your First Steps with Arduino Uno
As I showed you in our video, getting started with Arduino Uno is super straightforward:
Install the Arduino IDE: This is my Integrated Development Environment, where I write and upload all my code.
Connect your Arduino: I just use a USB cable to connect my board to my computer.
Write your first sketch: The Arduino programming language is based on C/C++, but it's simplified with an easy-to-use API. Every sketch has two main functions: setup() (runs once at the beginning for initial configurations) and loop() (runs repeatedly, containing all my main program logic).
Upload your code: With a click of a button in the IDE, my code is compiled and uploaded to the Arduino Uno. It's that simple!
Beyond the Basics: Real-World Applications
The Arduino Uno's versatility makes it my go-to for countless applications across various fields:
Home Automation: Think smart lighting, automated plant watering systems, or even remote-controlled appliances.
Robotics: Building simple robots, line followers, or even robotic arms.
Wearable Technology: Creating interactive clothing or accessories.
Environmental Monitoring: Projects like temperature and humidity sensors, or even air quality monitors.
Prototyping: It's an excellent tool for quickly testing ideas and concepts before moving to more complex systems.
Why Not AI (Yet)?
As I briefly touched upon in the video, while Arduino Uno is powerful, its limited memory (especially SRAM and Flash) makes it unsuitable for directly running complex Artificial Intelligence or Machine Learning algorithms. These tasks typically require significantly more processing power and memory. However, Arduino can still be a crucial part of an AI system, acting as the "hands and eyes" that collect data from sensors and send it to a more powerful computer (like a Raspberry Pi or cloud service) for AI processing, and then receiving commands back to control physical components.
Ready to Build?
The Arduino Uno is more than just a circuit board; it's a gateway to understanding electronics, programming, and problem-solving. I hope this deep dive has sparked even more curiosity in your Khurafati Labs mind!
